
Set up Auto Ordering
App guide · Orders
Auto Ordering takes over after a customer buys from your eBay store. Dropship Calendar uses your connected Amazon account and billing information to place the order and keep its progress organized in My Orders.
You choose how many orders each Amazon account can place and how delivery speed should be handled.
Before you begin
Section titled “Before you begin”Prepare:
- An Amazon shopping account that can place orders. This is not an Amazon Seller Central account.
- Access to the account’s email, phone, and verification codes.
- A working Amazon payment method and billing address.
- A Billing Account in Dropship Calendar.
Review the payment method and addresses directly in Amazon before connecting the account.
Connect your Amazon account
Section titled “Connect your Amazon account”Start in Dropship Calendar
Section titled “Start in Dropship Calendar”- Open Settings → AO Settings.
- Select Add supplier account.
- Choose Amazon and enter the requested account information.
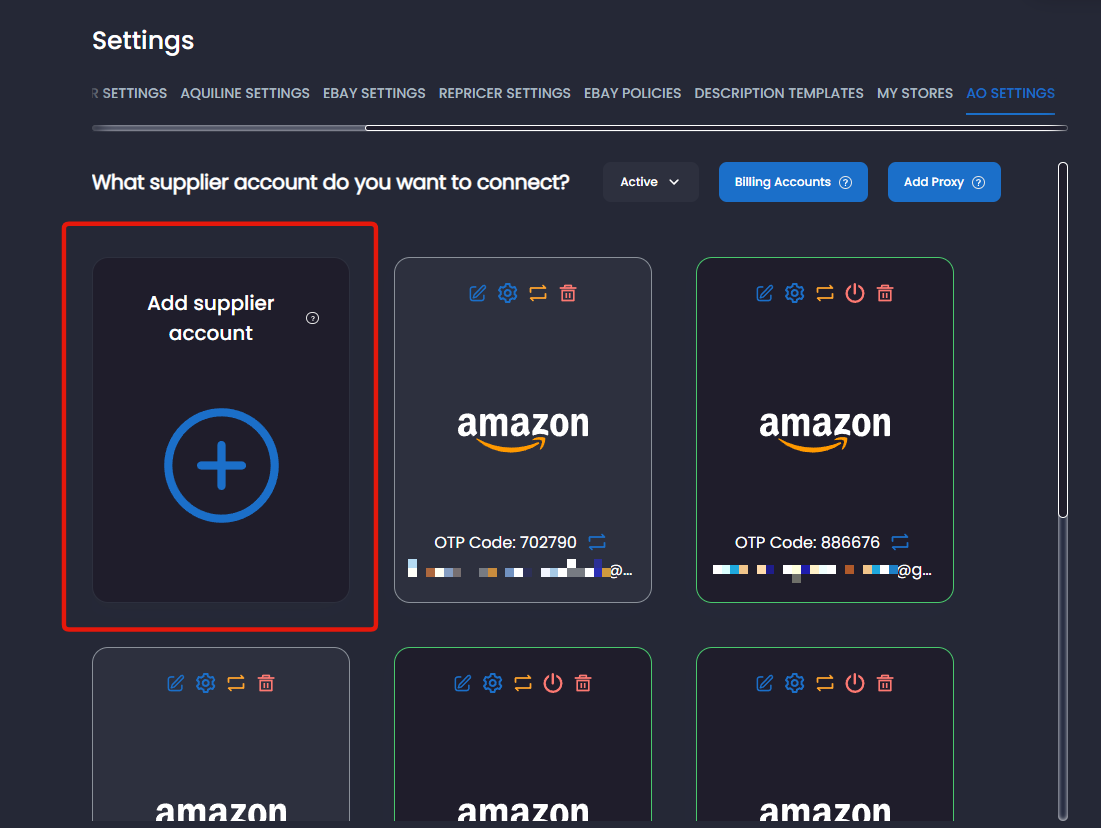
Dropship Calendar calls this a supplier account because it is the account used to buy the product after an eBay sale.
Turn on two-step verification in Amazon
Section titled “Turn on two-step verification in Amazon”- Sign in to the Amazon account you are connecting.
- Open Account → Login & security.
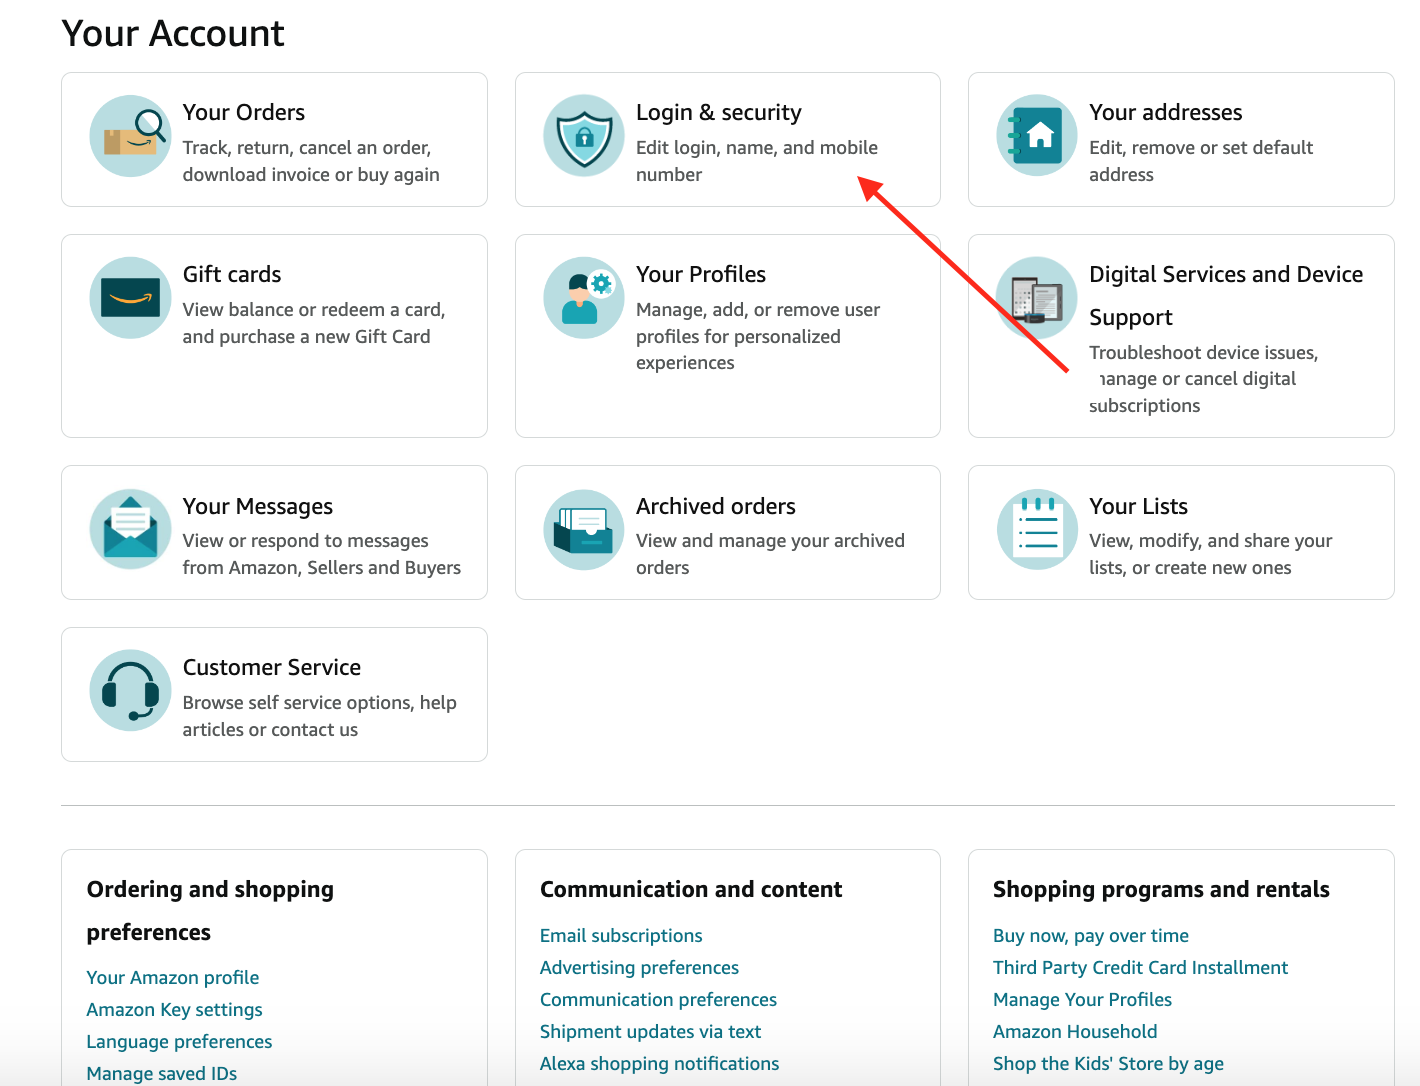
- Find 2-step verification and select Turn on. If it is already enabled, select Edit.

Required: remove phone verification
If a phone number is listed as a two-step verification method, remove it before continuing. Auto Ordering uses the Authenticator App setup key to generate verification codes. If Amazon sends a code to your phone instead, Auto Ordering cannot complete verification and the order may require manual attention.
Remove the number only from two-step verification—not from your delivery addresses or general Amazon contact information.
- Select Get Started, then choose Authenticator App.
- Under the QR code, select Can’t scan the barcode? Amazon will show a setup key that can be copied.
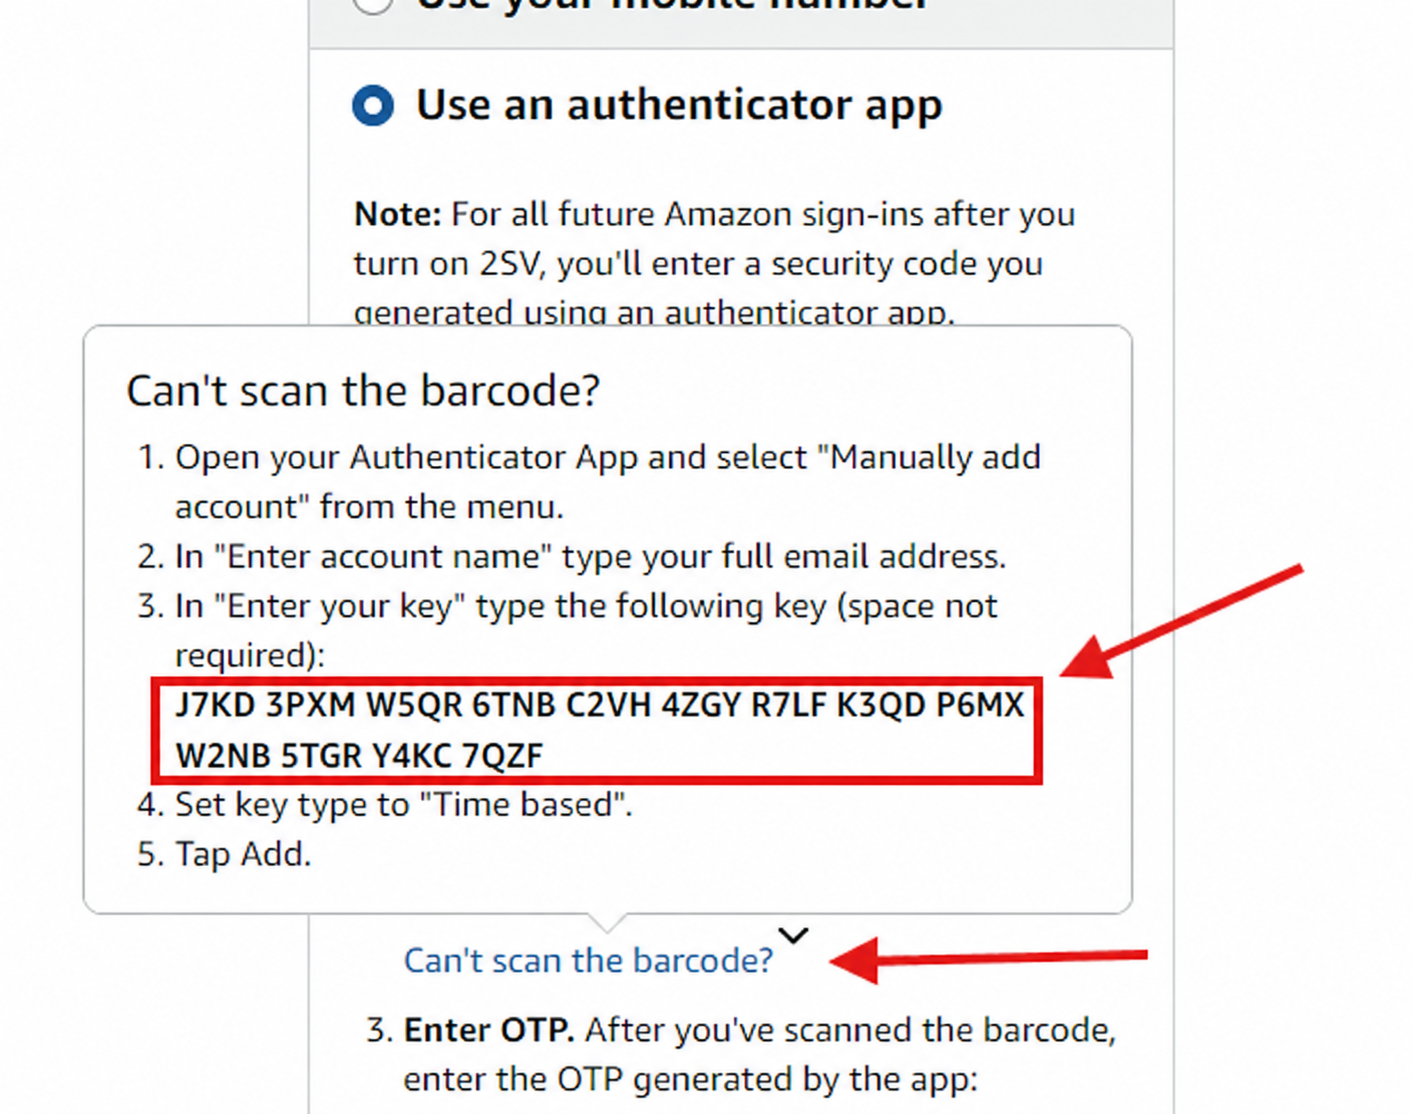
- Copy the setup key without any spaces.
- Return to the Dropship Calendar connection window and paste the key into the requested field.
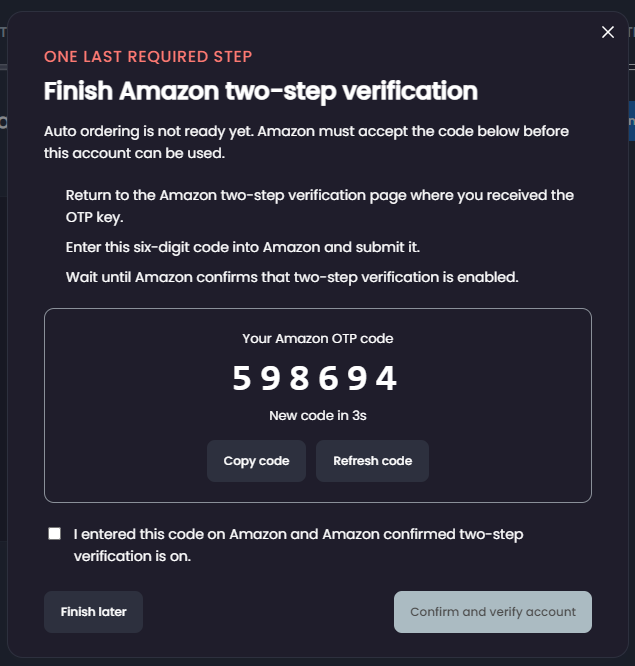
- Select Save. Dropship Calendar will open the Finish Amazon two-step verification modal and display a six-digit Amazon OTP code.
Required: finish two-step verification in Amazon
Saving the account in Dropship Calendar does not finish turning on two-step verification. Keep the modal open, copy its newest Amazon OTP code, return to Amazon, and complete every Amazon confirmation step. If you stop after entering the code, two-step verification is still not on and Auto Ordering cannot use this account.
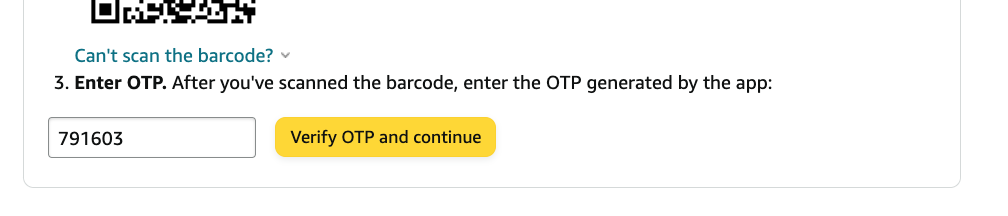
- In the modal, select Copy code. Return to Amazon, enter the code in the verification field, and select Verify OTP and continue.
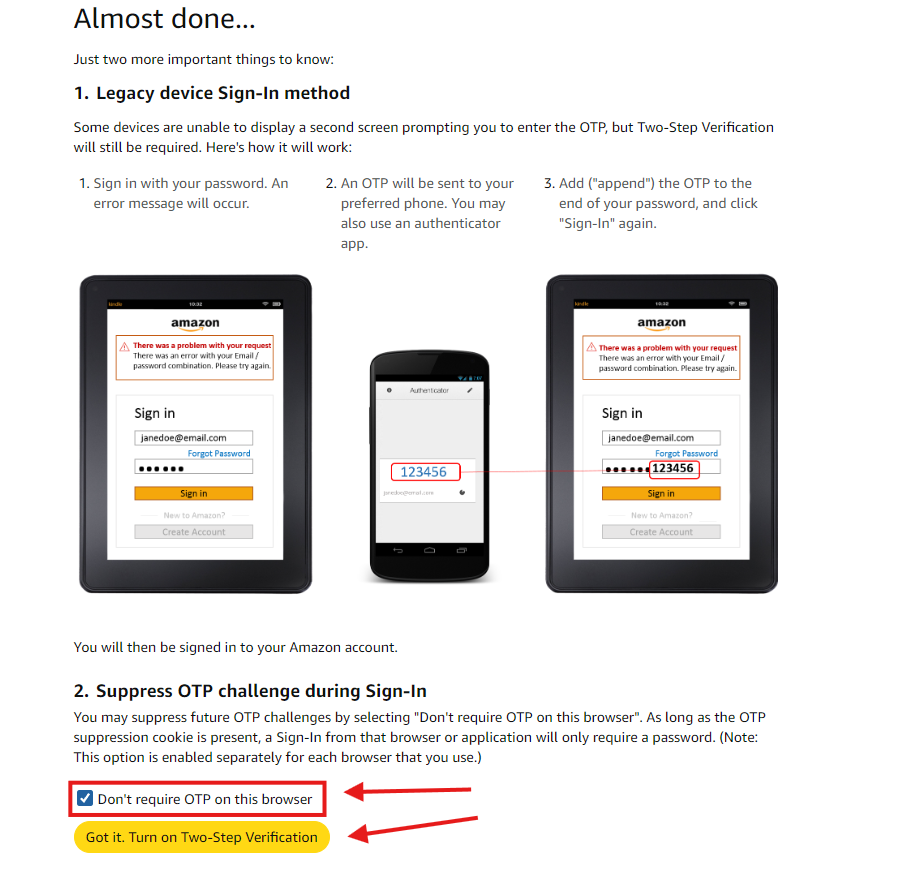
- Amazon will open an Almost done… page. Under Suppress OTP challenge during Sign-In, select Don’t require OTP on this browser.
- Select Got it. Turn on Two-Step Verification at the bottom of the page. Entering the OTP alone does not complete setup; you must select this button.
- Wait until Amazon confirms that two-step verification is turned on.
- Return to the Dropship Calendar modal and select I entered this code on Amazon and Amazon confirmed two-step verification is on.
- Select Confirm and verify account. The button becomes available after you select the confirmation checkbox.
Verification codes change regularly. Always use the newest code shown in the modal. If the code expires before Amazon accepts it, select Refresh code and enter the new code instead.
Finish the setup later
Section titled “Finish the setup later”Select Finish later if you must leave the confirmation screen before Amazon finishes enabling two-step verification. This closes the screen, but it does not complete setup. The Amazon account remains unavailable to Auto Ordering.
When you are ready to continue:
- Return to Settings → AO Settings.
- Find the Amazon account and select Finish 2FA setup.
- Complete the Amazon steps using the newest code shown.
- Select the confirmation checkbox, then select Confirm and verify account.
Edit an Amazon account
Section titled “Edit an Amazon account”Select the edit button on an existing Amazon account to change its supplier email, password, billing account, or proxy. The stored Amazon OTP key appears as •••••••••••••••• Saved. Leave it unchanged to keep the existing authenticator connection; you do not need to enter the key again when changing the other account details.
Select Replace OTP key only when connecting a different Amazon account or when Amazon has issued a genuinely new authenticator setup key. Entering a replacement key requires you to complete the Amazon confirmation steps again before Auto Ordering can use the account.
Confirm the account is ready
Section titled “Confirm the account is ready”After connecting the account, check its status in AO Settings:
- Finish 2FA setup means Amazon confirmation is incomplete and Auto Ordering cannot use the account.
- When Finish 2FA setup no longer appears, allow account verification to finish and confirm the account becomes Active.
- Not Active means the connection still needs attention before Auto Ordering can use it.
If the account is not Active, open its settings and follow the message shown before relying on it for an order.
Choose your order settings
Section titled “Choose your order settings”Review these settings before the first order:
- Billing Account is the payment information used for Amazon orders.
- Daily order limit is the most orders this Amazon account can place in one day. Start with a low limit while confirming the account works as expected.
- AO Max Delivery Days prevents Auto Ordering from choosing an offer expected to arrive too late.
- More Profitable prioritizes a qualifying offer with the better price.
- Faster Delivery prioritizes a qualifying offer expected to arrive sooner.
If Dropship Calendar asks for a proxy during setup, select Add Proxy and follow the instructions shown. If the connection process does not ask for one, you can skip that step.
Confirm Auto Ordering is ready
Section titled “Confirm Auto Ordering is ready”Before relying on Auto Ordering, confirm that:
- No phone number is listed as an Amazon two-step verification method.
- Amazon confirms that two-step verification is turned on, including completion of the Almost done… page.
- You completed the Dropship Calendar confirmation screen and Finish 2FA setup no longer appears on the account.
- Account verification finishes successfully and the account shows Active.
- A Billing Account is assigned and the daily order limit is set.
- Delivery and offer preferences are selected.
- The Amazon payment method and addresses are correct.
- You are prepared to monitor the first order in My Orders.
What happens after a sale
Section titled “What happens after a sale”- A customer orders one of your products on eBay.
- The order appears in My Orders.
- Auto Ordering uses a connected Amazon account to place the supplier order.
- Order and tracking progress remain visible in Dropship Calendar.
Amazon may provide a TBA number after the order ships. Learn what happens next in Amazon TBA tracking with Aquiline.
Do not send your Amazon password, verification setup key, one-time codes, or complete payment information to support.